Manage Elements
The Manage Elements feature located within the Site Configuration branch of the Administration tab allows the admin to create and manage the elements that make up each of the assets in the system, including physical elements, protective systems, and defects.

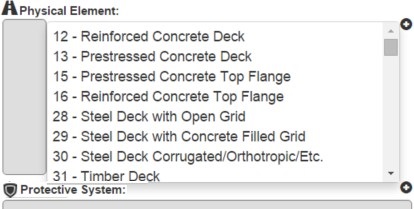
Physical Elements
To view the system's physical elements, select the Physical Element portion of the bar at the top of the page. This will display all of the physical elements available to make up any asset in the system.

Create Physical Element
To create a new physical element, click the Create Physical Element button in the top right corner of the screen.
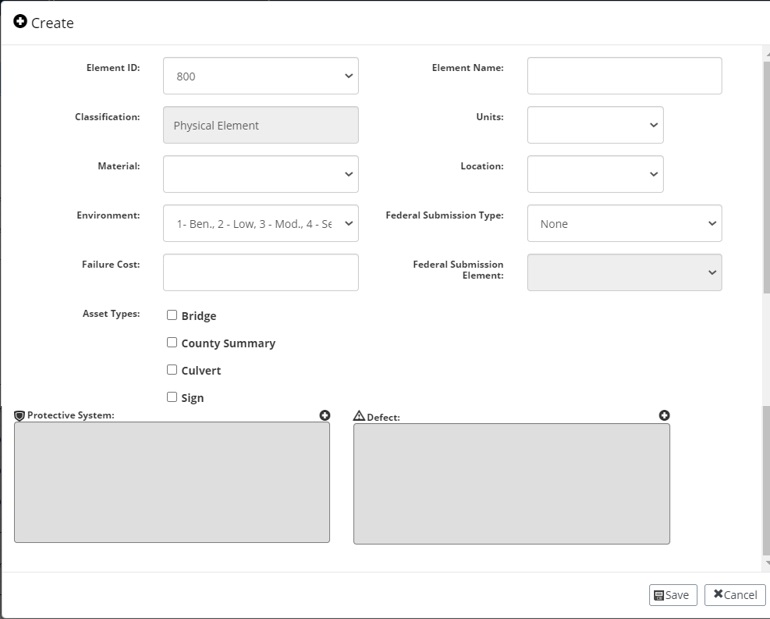
- Element ID – The Element ID drop-down is the FHWA ID given to the element.
- Element Name – The Element Name textbox indicates the name of the element and will be displayed as "[Element ID] [Element Name]" when referenced throughout AssetWise Inspections.
- Classification – The Classification textbox displays whether the element is a physical element, protective system, or defect. This field cannot be edited.
- Units – The Units textbox is used to enter the metric or English units used to measure the element.
- Material – The Material drop-down indicates the type of material that makes up the element.
- Location – The Location drop-down indicates in what part of the asset the element is located.
- Environment – AssetWise Inspections does not use a structure's environment for analytics, but it does allow the inspector to record a structure's environment for their own purposes.
- Federal Submission Type – The Federal Submission Type drop-down indicates whether the agency defined element can be combined with or override the standard MAP 21 elements for submission.
- Failure Cost – The Failure Cost textbox entry is utilized in the bridge health index calculation.
- Federal Submission Element – When the Federal Submission Type drop-down selection is Combine With Federal Element or Override Federal Element then the Federal Submission Element drop-down will become available for use.
- Non-FHWA elements can be
created to serve various purposes, but will only be submitted with the NBI tape
if they are linked to an FHWA element. The Override Federal Element selection
allows the admin to determine to which FHWA element the new element will be
linked to. This way, when the NBI tape is submitted, the information from the
new element will be included.
- Example: If your agency is testing out the use of a new material for Element 12 Reinforced Concrete Deck, a new Element ID may be used rather than including the test material in with Element 12. However, this information still needs reported. Therefore, the new material's Element ID will be set to override Element 12 so that structures using the new material will have that data included in the NBI tape.
- The Combine With Federal Element selection allows the admin to determine to which FHWA element the new element will be combined with. This way, when the NBI tape is submitted, the information from the new element will be totaled with the FHWA element.
- Asset Types – The Asset Types checkboxes allow the admin to indicate which asset types contain the physical element. Some elements are likely to be used for multiple asset types, while others are unique to a specific asset type.
- Add Protective System and/or Defect – The Protective System and Defect boxes allow the admin to associate specific protective systems and/or defects with the physical element.
- To link a protective
system or defect to the physical element, click the
 symbol for either and select the
desired item from the drop-down:
symbol for either and select the
desired item from the drop-down:
- To delete an item that has
been added, click the
 symbol for the desired item.
Note: Associating physical elements, protective systems, and defects can be
done during creation of any of the three elements.
symbol for the desired item.
Note: Associating physical elements, protective systems, and defects can be
done during creation of any of the three elements.
- Save or Cancel – Click the Save button to complete the creation of the physical element. Click the Cancel button to cancel the creation of the physical element.

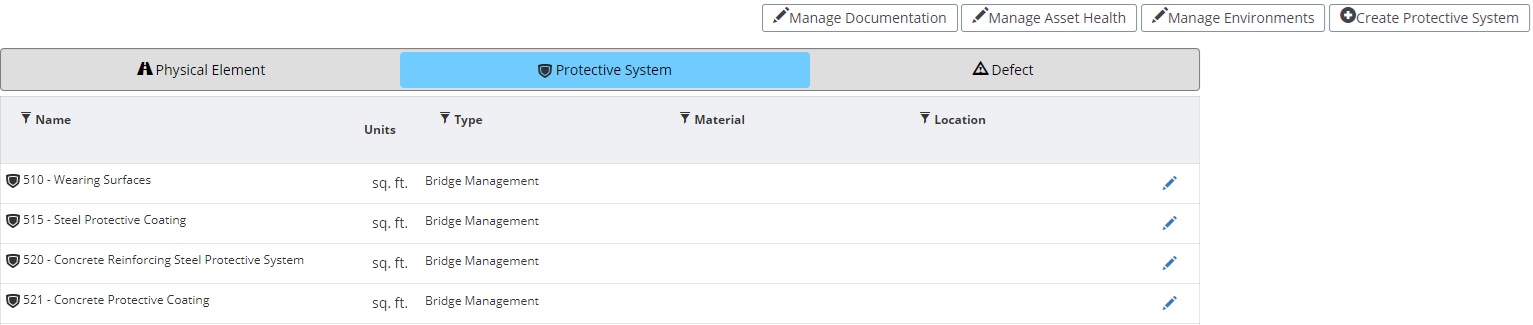
Protective Systems
To view the database's protective systems, select the Protective System portion of the bar at the top of the page. This will display all of the protective systems available for assets in the database.

Create Protective System
To create a new protective system, click the Create Protective System button in the top right corner of the screen.
- Element ID – The Element ID drop-down is the FHWA ID given to the protective system.
- Element Name – The Element Name textbox indicates the name of the protective system and will be displayed as "[Element ID] [Element Name]" when referenced throughout AssetWise Inspections.
- Classification – The Classification textbox displays whether the element is a physical element, protective system, or defect. This field cannot be edited.
- Units – The Units textbox is used to enter the metric or English units used to measure the protective system.
- Failure Cost – The Failure Cost textbox entry is utilized in the bridge health index calculation.
- Federal Submission Element – When the Federal Submission Type drop-down selection is Combine With Federal Element or Override Federal Element then the Federal Submission Element drop-down will become available for use.
- Non-FHWA protective systems can be created to serve various purposes, but will only be submitted with the NBI tape if they are linked to an FHWA protective system. The Override Federal Element selection allows the admin to determine to which FHWA protective system the new protective system will be linked to. This way, when the NBI tape is submitted, the information from the new protective system will be included.
- The Combine With Federal Element selection allows the admin to determine to which FHWA protective system the new protective system will be combined with. This way, when the NBI tape is submitted, the information from the new protective system will be totaled with the FHWA protective system.
- Asset Types – The Asset
Types checkboxes allow the admin to indicate which asset types can use the
protective system. Some protective systems are likely to be used for multiple
asset types, while others are unique to a specific asset type.
- Add Physical Element and/or Defect – The Physical Element and Defect boxes allow the admin to associate specific physical elements and/or defects with the protective system.
- To link a physical
element or defect to the protective system, click the
 symbol for either and select the
desired item from the drop-down:
symbol for either and select the
desired item from the drop-down:
- To delete an item that
has been added, click the
 symbol for the desired item.
Note: Associating physical elements, protective systems, and defects can be
done during creation of any of the three elements.
symbol for the desired item.
Note: Associating physical elements, protective systems, and defects can be
done during creation of any of the three elements.
- Save or Cancel – Click the Save button to complete the creation of the protective system. Click the Cancel button to cancel the creation of the protective system.